What you need to start home brewing
The equipment, ingredients and costs for a first batch of beer at home in Australia, with links to compare prices.
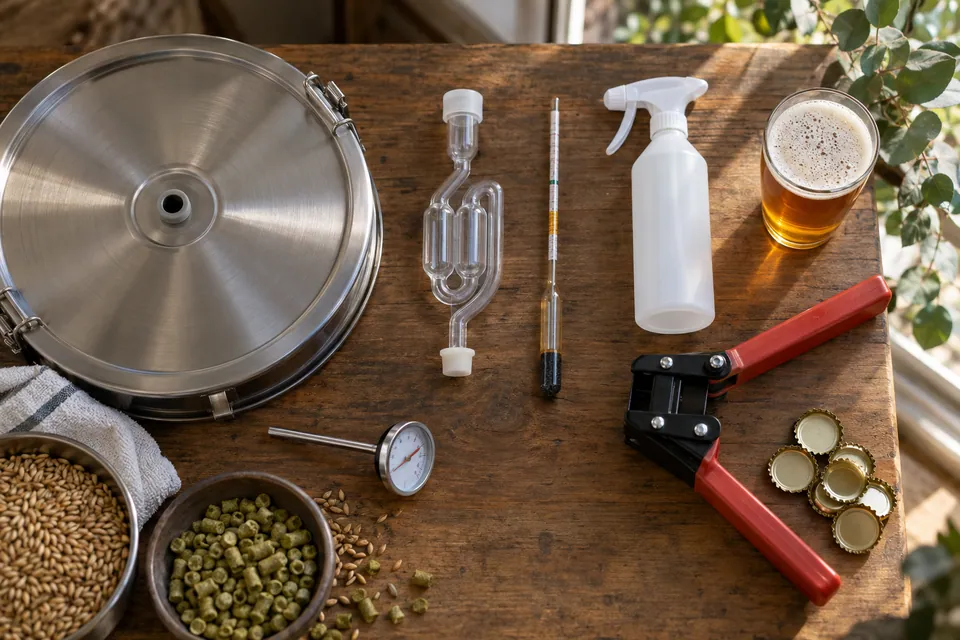
Search for a starter list and you will find plenty, most naming the same long run of items without saying which ones you could skip. This guide sorts the essential from the optional, explains why each piece exists, and walks through a first batch in order. The short version: a beginner kit with a tin of malt extract, plus a sanitiser and a way to keep the brew at the right temperature, is enough to make your first beer.
It is written for people who have never brewed, so each term is explained the first time it appears. There is also a short legal note near the end, because the rules around distilling surprise a lot of people.
Pick your route: kit, extract or all-grain
There are three common ways to make beer at home. They differ in how much work you do yourself and how much equipment you need.
Kit with a tin. A “kit” is a bundle of equipment, usually a fermenter, a lid, bottles and a hydrometer, plus a tin of concentrated malt extract and a sachet of yeast. You dissolve the extract in warm water, top up to volume, add the yeast and wait. This is what most people picture when they think of a first brew.
Extract plus extras. “Extract” is malt that has already been mashed and concentrated for you, as a thick syrup or a powder. Many kits are built on it. This route goes a step beyond a basic kit: you buy extract and other ingredients separately and mix your own combinations, often with a pot big enough to heat some of the water. It needs the same fermenting gear as a kit, plus the pot.
All-grain. You mash crushed malted barley in hot water yourself to make the sugary liquid (called wort, pronounced “wert”) that yeast turns into beer. It gives the most control and needs the most equipment: heating, a way to cool the wort quickly, and more space and time. Electric all-in-one systems such as the Grainfather G30 V3 bundle that equipment. The listing says it makes up to 25 litres of wort per brew and recommends a counterflow chiller, which is sold separately.
For a first brew, pick the kit. That is a judgement call rather than a rule. A kit bundles the pieces you would otherwise buy one by one, and it keeps the number of things that can go wrong small while you learn cleaning, temperature and patience. Fresh wort kits, where a brewery supplies ready-made wort, also exist, but they sit outside this guide.
Catalogue listings show how much comes in the box. The listing for the Coopers DIY Beer Brew Kit 23L from $149.00 at Coopers DIY · checked 57 min ago says it includes a 34 litre fermenter with a Krausen Kollar, 30 PET bottles of 740 ml, a hydrometer, a bottling valve, a spoon and the ingredients. The Coopers DIY Small Batch Brew Kit 10L makes a smaller batch, with a 13 litre fermenter and 12 bottles, which suits a household that wants to try brewing without committing to 23 litres. The Mangrove Jack’s Starter Brewery Kit from $119.95 at Brewmart · checked 57 min ago lists a 30 litre fermenter with a tap, 30 PET bottles and carbonation drops, and the Morgan’s Brewing Starter Kit from $99.00 at The Brew Shed · checked 57 min ago lists a fermenter with a tap and airlock plus 30 PET bottles with caps. Those are catalogue descriptions, not test results. To line kits up side by side, use the kit comparison, and for recommendations see our guide to the best home brew kits in Australia.
What you actually need
The list below is split by whether a first batch genuinely depends on the item.
Essentials
- A fermenter with a lid. This is the food-safe container where the yeast does its work over the first week or so. The lid should close, and you need either a tap for bottling or a way to siphon. An airlock (a small one-way valve that lets gas out and keeps air out) is common, though Coopers’ instructions say to keep the lid closed during fermentation. If you need a fermenter on its own, the fermenter comparison covers the options, and the Coopers DIY Fermenting Vessel 23L is one catalogue example that lists a Snap Tap and a thermometer strip.
- A sanitiser. A product made for brewing, used on everything that touches the wort or beer. Coopers calls sanitising everything well “the golden rule”.
- A hydrometer. A floating glass instrument that measures how dense the liquid is. Sugar makes it denser, so as yeast turns sugar into alcohol the reading drops. That reading is called gravity, and once it stops changing, fermentation has finished. Most beginner kits include one.
- Bottles and caps. PET bottles are the usual beginner choice, and the kits above list them.
- Ingredients. The tin of extract, the yeast, and a fermentable such as sugar or a brew enhancer. Coopers notes that later batches need a fresh extract tin plus Brew Enhancer, so this is a cost every time you brew.
- A thermometer. A stick-on strip on the fermenter is enough.
- A long spoon that can be sanitised, for stirring.
- Carbonation drops. Small sugar tablets that go into each bottle to create the fizz. Coopers describes each one as roughly 3 grams of sugar.
Nice to have
- A heat belt or temperature controller. One Australian retailer guide says plainly that they are not necessary to make beer, but give more control. Whether you want them depends on your climate.
- A spare fridge or freezer. Used with a controller, an old fridge becomes a fermentation chamber that can hold a steady temperature all year. Australian retailer guides suggest this setup.
- Kegging gear. Kegs, gas and regulators are a sensible later step, not a first-batch need.
- Built-in temperature control. The Grainfather GF30 Conical Fermenter Pro is the one catalogue fermenter that lists built-in heating (a 30 W element, up to 10 degrees Celsius above ambient) and a jacketed cooling sleeve. It is a big step up from a basic fermenter and not something a first brew requires.
Cleaning and sanitising
Cleaning and sanitising are two jobs. Cleaning removes visible residue. Sanitising reduces the microbes that cleaning leaves behind, and Coopers puts it at the top of its advice, saying to sanitise all equipment before each brew.
Clean first, then sanitise with a product made for brewing, and follow that product’s label for strength and contact time. Labels differ, so no single rule fits every product. As an example, Five Star’s Star San page gives a dilution of 1 ounce per 5 gallons of water and a contact time of at least one to two minutes, and says to drain but not rinse. That applies to Star San only.
One more rule from Coopers’ FAQ: do not clean PET bottles with hot water. Sanitise them with your sanitiser solution and drain them, following the label on rinsing.
Keeping temperature right in Australian conditions
Beginner advice on temperature contradicts itself because different yeasts have different working ranges. What holds up is the range on the label or data sheet of the yeast you are actually using, not any single number you read online. The sources differ like this:
- Coopers kit instructions. Coopers’ first-time brewer page says to keep the brew steady between 21 and 27 degrees Celsius, and the Coopers FAQ adds that you should aim for the lower end. It also says a racing fermentation from high temperatures can affect head retention. That applies to Coopers kits with their yeast.
- Fermentis ale yeasts. The SafAle US-05 and SafAle S-04 pages both say “ideally 18-26 C”. The catalogue carries both: Fermentis SafAle US-05 and Fermentis SafAle S-04.
- A Fermentis lager yeast. SafLager W-34/70 is listed at 12-18 C, much cooler than the ale yeasts. See Fermentis SafLager W-34/70.
- Nottingham. The LalBrew Nottingham data sheet gives an optimal range of 10-25 C for traditional styles. It is a distributor’s copy of the manufacturer’s sheet and its version is unknown, so check the sachet for your batch. The yeast is stocked as Lallemand Nottingham.
- Australian retailer blogs. Some suggest a cooler window of roughly 18 to 22 or 24 degrees for ale. These are opinions from sellers, not yeast makers, so treat them as one view rather than the rule.
The ranges overlap but they do not match. If you buy a kit, read the yeast sachet and the kit’s instruction sheet and use those. If you swap the yeast, swap the range.
Summer. Heat is the usual problem across much of Australia. Fermenting yeast also produces its own heat, so a fermenter in a hot room can run warmer than the room. The Australian Home Brewing cooling article describes four methods that need no special equipment: choose a cool spot out of direct sun; wrap the fermenter in a wet towel with a fan nearby; stand it in a water bath such as a laundry sink or esky; or rotate frozen bottles or ice packs. The article gives no tested temperature drops, so use your thermometer strip to see what works in your space.
Cold weather. Coopers’ FAQ notes that fermentation generates heat, so when it is cold, the suggestion is to insulate the fermenter rather than cool it. A heat belt or controller is the usual next step if insulation is not enough, though the support for that is retailer opinion rather than a manufacturer instruction, so the details depend on your gear and your yeast.
Your first brew, in order
This follows the pattern in Coopers’ kit instructions. If your kit has its own instructions, follow those where they differ.
- Clean and sanitise. Wash the fermenter, spoon and anything that will touch the wort, then sanitise it according to your sanitiser’s label. Check: nothing has visible residue, and you have followed the label’s contact time.
- Make the wort. Dissolve the tin and the sugar or enhancer in warm water in the fermenter, then top up to the volume the instructions give. Check: the strip thermometer reads inside the yeast’s range on its label.
- Take a starting reading. Float the hydrometer and write the number down. You will compare it with later readings.
- Add the yeast and close the lid. Fermentis product pages describe both rehydrating and sprinkling directly, and the Lallemand sheet names dry pitching as its preferred method. Follow the instructions that come with your yeast. Check: the lid is on, and the fermenter sits somewhere steady and out of direct sun.
- Wait, and watch the temperature. Coopers says fermentation takes about a week. Check the strip daily.
- Check the hydrometer. This one check decides whether you can bottle. A reading that stays the same over at least two days means fermentation has finished. Check your kit’s instructions, because Coopers words it differently in different places (two days in one, two to three in another). Do not bottle on a calendar date.
- Bottle. Sanitise the bottles, put two carbonation drops in each 740 ml bottle (Coopers’ amount), fill, and cap.
- Condition. Store the bottles upright in the dark at around 18 degrees Celsius for about two weeks, then chill. That is the Coopers figure. Other sellers recommend longer, so treat it as the minimum for a kit.
If something goes wrong
- Too hot. Move the fermenter somewhere cooler and use the methods above. Do it early, because a very fast fermentation is what the Coopers FAQ warns about.
- Too cold, or it seems to have stalled. Insulate it, or move it somewhere a few degrees warmer, within your yeast’s range. Then take two readings a day apart before you decide anything.
- Readings still dropping. It is not finished. Wait and measure again.
- Bottle pressure. Coopers stresses confirming a stable reading before bottling, so do not bottle early, and do not use more drops than your kit’s instructions give.
What it costs, without the numbers
Prices change too often to print here, so this guide leaves them out. Knowing where the money goes helps more. The one-off part is the fermenter, bottles, hydrometer and sanitiser, much of which a kit bundles. The recurring part is the extract, yeast, enhancer or sugar, drops and sanitiser you replace every batch.
Cost moves with batch size, the route you choose, and whether you add temperature control. A basic setup with no heating or cooling asks the least up front but leaves you at the mercy of the weather. Current prices are on the live badges next to the kits above.
The legal line
In Australia, home-brewed beer, cider and wine made for non-commercial purposes using non-commercial equipment can be made without an excise licence, according to the Australian Taxation Office. Spirits are different. Distilling requires an excise manufacturer licence, and the ATO states it does not grant licences to distil spirits for personal consumption.
That is the federal excise position only. State and territory rules, and rules about selling or supplying what you make, are not covered here, so check your own state before going beyond brewing for your household. This guide does not cover distilling.
Where to get help
Local shops can answer what a guide cannot: what is in stock, what suits your climate, and how to fix a batch that smells wrong. The shop directory lists Australian homebrew shops by state. Local clubs and online forums are another place to learn, and at least one Australian retailer guide recommends joining one.
Where to go next
With a kit, a sanitiser, a thermometer and a hydrometer, you can write a shopping list and start. Read your yeast’s label before you set the fermenter anywhere, and let the hydrometer, not the calendar, tell you when to bottle. When you are ready to choose, our kit guide is the next step.